I tested it and managed to cram it all onto one panel, and the
dimensions seem cromulent, so I'm going to call it supported, even if it
remains unused
The Buildable Stick System
Files for 3D printing and building an arcade stick enclosure.
Have you ever wanted to conjure your own arcade stick out of the ether (well, plastic), or to prototype a new layout or design before sending it to a custom builder? Do you just love having your space filled with arcade stick enclosures, because you keep making different variants, colorways, and so on? Or do you simply want a good stick on the cheap, and know someone or a library with a 3D printer? The Buildable Stick System may be the project for you!
Join the project IRC channel: #buildable-stick-system @ Randomus!
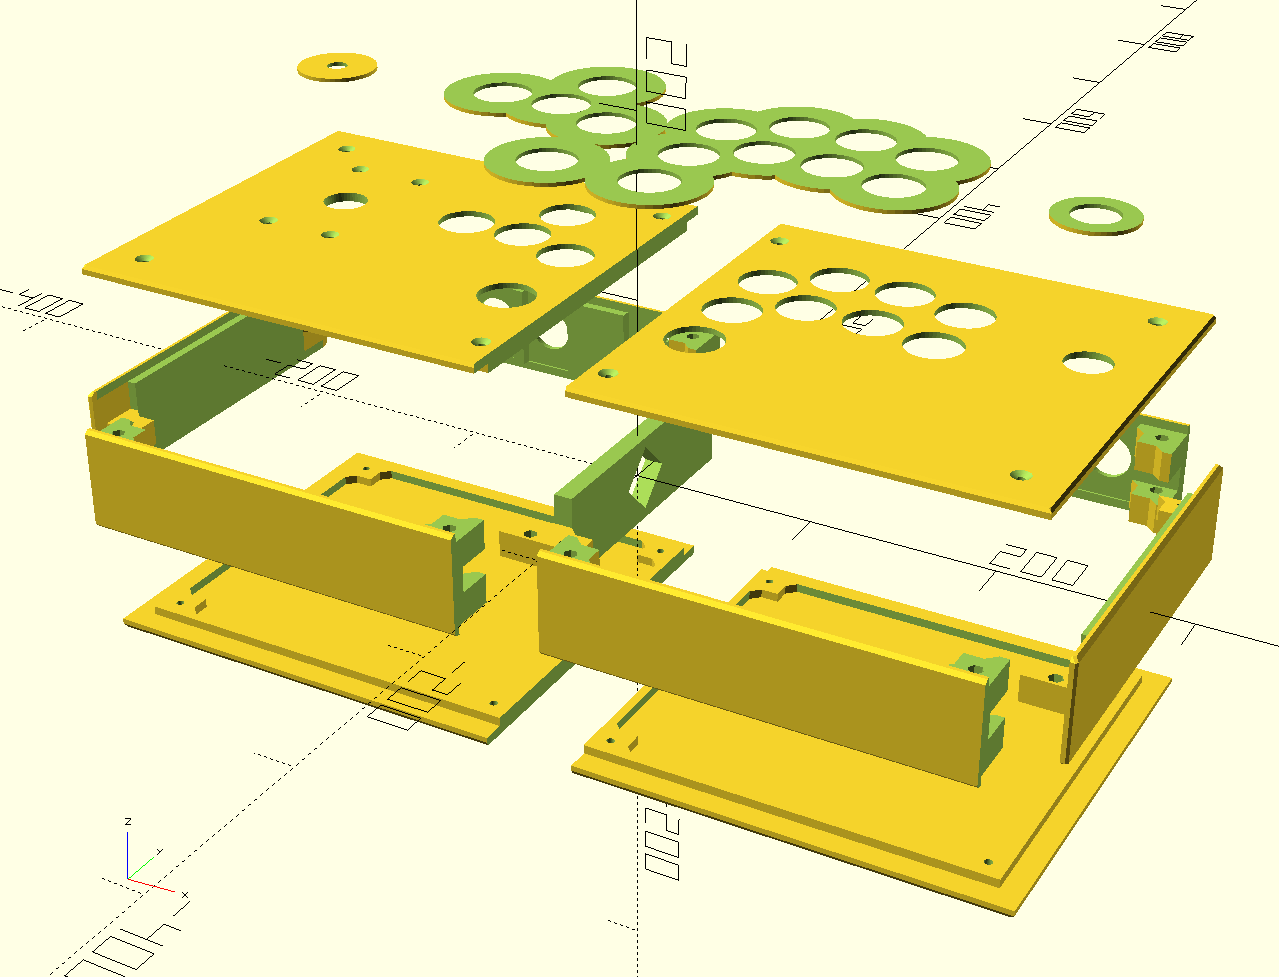
[OpenSCAD-based illustration of how the components for an overhang panel-based stick fit together.]

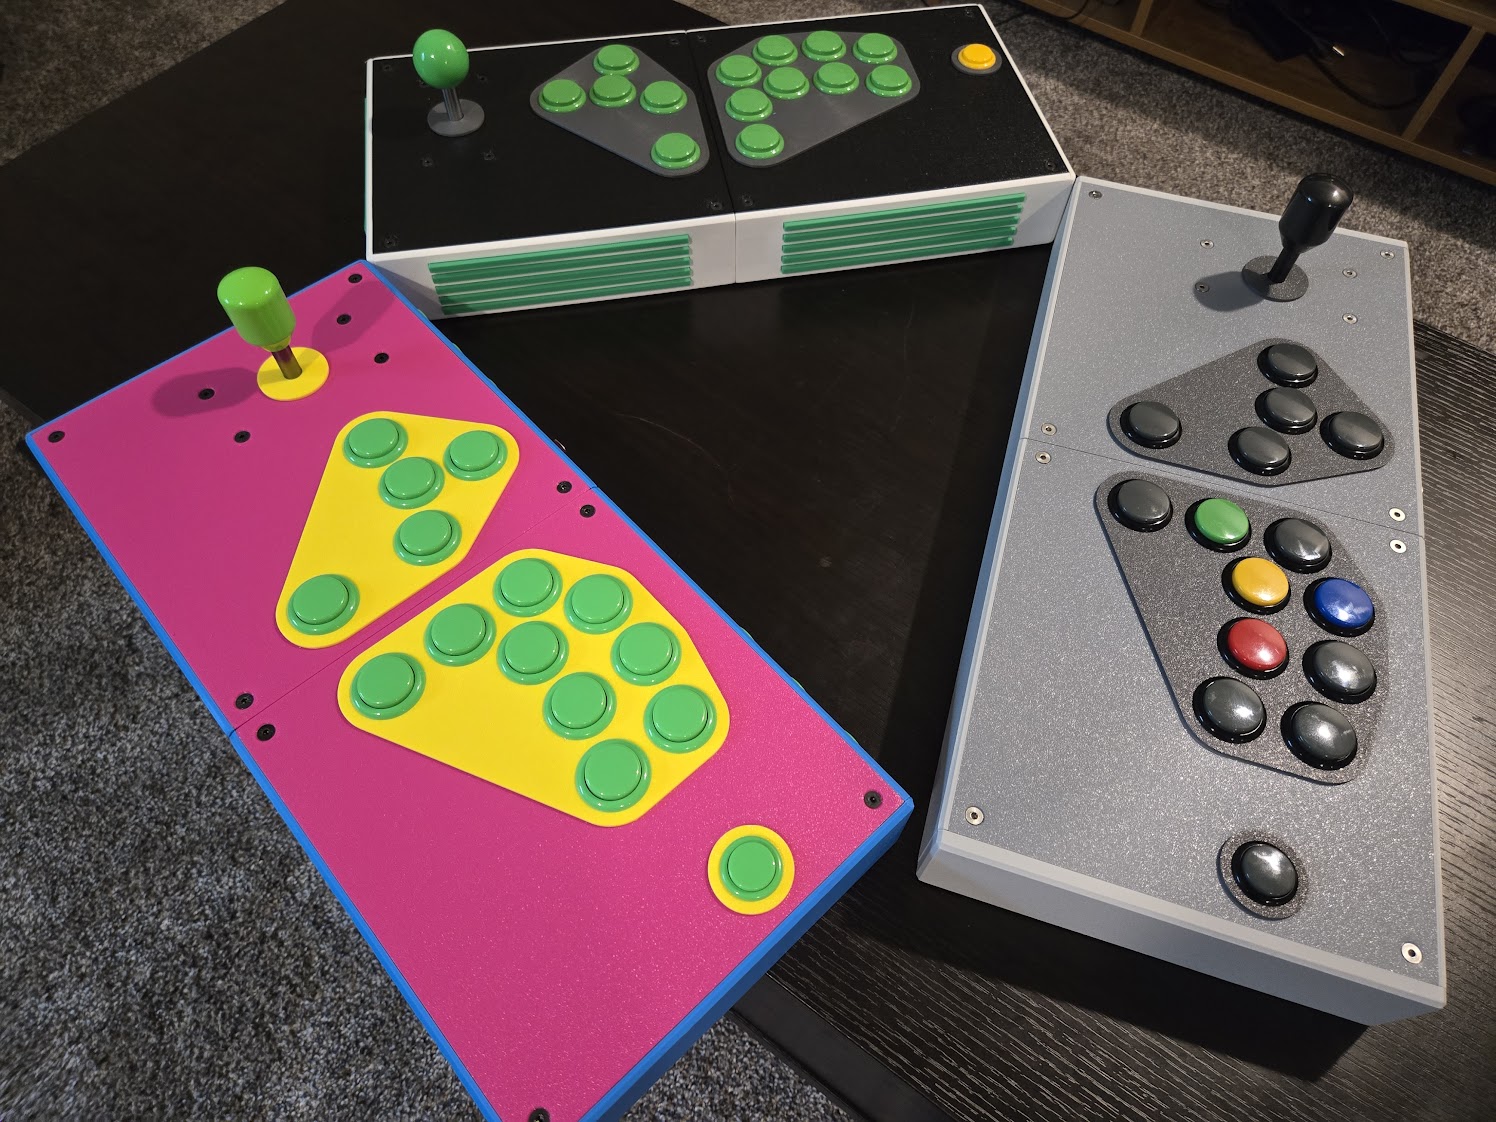
[Photo of a completed overhang panel-based stick.]
Originally an attempt to make a couple customized STL files for the OpenStickCommunity Fightstick Case, the changes ballooned to fit my design and became incompatible with that project's components. This should be considered a different project with some similar DNA, but to stress again, it could not have been done without that project as a guide star. See Attribution.
Designing
No particular arcade stick design is prescribed by this project, instead, SCAD files are provided to choose desired component objects or create new ones. The OpenSCAD language is essentially a functional programming language, making it it easy to reuse, alter, and compose objects. If you do not see the object you would like, you can likely create it by starting with an existing object and constructing what you'd like with new or existing components.
Usage of Parts
There are a lot of parts to pick from, but there are some structural variants to pay attention to; here's some help about what the types of parts are and how to use them:
frames/complete/--- these are the four walls of the frame as one piece, in a couple variations for combining into larger arcade sticks. They are simple to assemble, but you have fewer modularity/customization options, and they are harder to print because the physics of the material cooling will probably pull the corners up. They also need supports, since the top and bottom of the frame both have trays for panels to go into. Use at your own risk.pieces/these are the same four walls (generally speaking) as in the complete frames above, broken out into modular pieces to print separately. Because they are separate pieces, you can mix and match colors, and you can lay them all face down on the print surface for better adhesion and surface patterns. There are also variants here, the "windowed" pieces, for doing two-tone variants and that kind of thing. There are also frame walls pulled out to create MCZ TE-style extended sides. There is an interconnect that stands in for the joined inner wall between boxes of the overall unit. You need this if you are combining multiple sets of walls, e.g. for a two-panel-long stick.
panels/inset/--- various panels, all of the same size, that fit into and flush with the frame, making the arcade stick top or bottom. Aside from using up a bit of the space for components inside the frame, come with no downsides --- they print easily and are a pretty simple shape to tweak and remix.overhang/--- overhang panels have their plane extending over the edge of the frame, creating a bit of a sandwich look. This is mostly an aesthetic choice, but they sit higher in the frame as well, the main panel being over/under the frame rather than within it. This extra space is useful for taller levers. The only downside to these is that they aren't as reusable as the inset panels, since the inset panels can go anywhere, but the overhang panels must be designed to not overlap with other overhang panels, so you might have to make more custom variants depending on where you put things.
plates/- Flat pieces used for cosmetic or connective reasons --- decorative plates for top buttons and similar to give more color variance and some layers to the arcade stick, some very simple dustwashers, plates that fit rocker switches and the like in Neutrik D or 20mm holes, and a lever mount spacer for getting your lever shaft at the desired height. You don't need any of these, but you'll probably use a few.
misc/- Pieces that I haven't organized better (yet) --- odd things and scratch ideas, mostly. There are some decorative corners for a bit more height/nicer seams, a sleeve to make smaller hex spacers fit in the hole as they're supposed to, things of that nature.
extras/- Various experiments and things not directly related to making an arcade stick. At time of writing, there's a
couple pieces for a little stand for the stick, solely for vanity purposes.
bss-ae/--- these are pieces for an arcade control panel that fits on the Qanba 2009. See the docs in that directory for details.
- Various experiments and things not directly related to making an arcade stick. At time of writing, there's a
couple pieces for a little stand for the stick, solely for vanity purposes.
Feel free to request or contribute to more objects. Additional documentation regarding assembling the stick is available
in docs/assembly-and-tips.md.
Printing
These items all fit on a 256mm^2 print bed; I use a Bambu Lab P1P based on what I've learned from the
OpenStickCommunity. Standard settings seem sufficiently sturdy, but see docs/printing-and-materials.md for more
thoughts and settings based on my tinkering with prints.
Assembling
What you'll need beyond these objects:
- An arcade stick board (I recommend TheTrain's RP2040 Advanced Breakout
Board)
- 4 M3 8mm hex bolts to secure the PCB to a panel
- Per frame and panel combo:
- 4 45mm M4 hex brass standoffs (or equivalent)
- 8 M4 countersunk hex bolts
- Overhang panels should use 12-16mm length bolts since they are taller
- Inset panels should probably use 8-12mm bolts --- some standoffs aren't threaded the whole way, making 16mm too long to go flush
- If making the 45mm standoffs from multiple smaller ones, make sure they have enough length to take your bolts!
- Per frame connection point (only necessary if you are using complete frames and not frame pieces):
- 8 16mm M4 bolts
- 8 M4 flange nuts
- For a lever:
- 4 12-16mm M4 countersunk hex bolts
- 4 M4 flange nuts
- For Neutrik D connections:
- 2 10mm M3 hex bolts
- 2 M3 flange nuts
- Buttons and levers as desired
- Wiring as required
Rough Costs
This is a rough estimate of the cost to produce one of these sticks, assuming a usual 2-frame design and layout. Filament masses from Bambu Studio estimates, using Bambu PLA Basic, 20% gyroid infill and 3 wall loops.
- Left and right frame: $10.42 USD (208.50g each, as of 2024-02-22)
- Left and right (inset) top panels: ~$6.40 USD (~128g each, as of 2024-02-22)
- Left and right (non-overhang) bottom panels: $6.80 USD (135.99g each, as of 2024-02-22)
- Miscellaneous mounting plates, decorative plates, etc.: ~$1.83 USD (~73g, as of 2024-02-22)
- 8 16mm M4 bolts to connect the frames: $0.72 USD (you can get a pack of 100 on Amazon for $9, as of 2023-09-12)
- These are only necessary if you are using the whole frames, but as a heads up, the material cost of the pieces-based interconnect piece costs around $1, so it's roughly a wash since that's also a frame wall.
- 8 M4 flange nuts to connect the frames: $0.68 USD (you can get a pack of 100 on Amazon for $8.50, as of 2023-09-12)
- 4 10mm M3 bolts to connect Neutrik D plates to frames: $0.40 USD (you can get a pack of 100 on Amazon for $10, as of 2023-09-12)
- 4 M3 flange nuts to connect Neutrik D plates to frames: $0.34 USD (you can get a pack of 100 on Amazon for $8.50, as of 2023-09-12)
- 8 45mm M4 standoffs to connect panels to frames: $2.40 USD (you can get a pack of 10 on AliExpress for $3, as of
2023-09-12)
- You could 3D print these too, but you're probably better off with brass ones as they give some weight to the stick anyway
- You can also use a shorter length with longer bolts, or combine multiple standoffs, if either of those yield better prices
- 8 16mm M4 bolts to connect top panels to frames: $0.72 USD (you can get a pack of 100 on Amazon for $9, as of
- 8 12mm M4 bolts to connect bottom panels to frames: $0.72 USD (you can get a pack of 100 on Amazon for $9, as of 2023-09-12)
With an enclosure coming in around $31, depending on your choices --- say, ~$30 for TheTrain's RP2040 Advanced Breakout Board, ~$60 for Sanwa buttons and a lever, and ~$20 for miscellaneous connectors and wiring --- you can put a full-featured controller with an open source foundation together for around $140. Reducing wall and infill settings will probably save you around $5 of material, and you can probably decide what you want to do from there.
FAQ
I get a bunch of warnings on not being able to include files when I open them in OpenSCAD, what do I do?
OpenSCAD pathing is relative to the current working directory by default, which is probably not the src/ directory.
When you start OpenSCAD, you must either start it from inside the project's src/ directory, or point it at the path to
the source files via e.g. OPENSCADPATH=path/to/buildable-stick-system/src/ openscad.
See https://en.wikibooks.org/wiki/OpenSCAD_User_Manual/Include_Statement.
Miscellany
See the /docs/ directory for more thoughts too scattered for this document.
Issues and Limitations
This is a living repository, and as such, there are likely issues with the objects, known or otherwise.
These issues may be fixed in the future; see TODO.md for details.
Development and Contributing
Improvements, variants, new layouts, novel ideas, and etc. are all welcome.
These files are suitable for previewing and rendering in OpenSCAD. They may also work in FreeCAD and perhaps other software, but they are developed in OpenSCAD, so YMMV otherwise.
This project is hosted at my personal Git site, but people are more likely to want to interact with the GitHub mirror. Feel free to use either.
I'm reachable on the fediverse, over email, or on Discord, but if you're looking for an option I prefer, I maintain an
IRC channel, #buildable-stick-system, on my IRC network, Randomus if you would like a place
to hang out and discuss issues and features and whatnot.
Attribution
Author and Licensing
Written by and copyright Brian S. Stephan (bss@incorporeal.org).
The Buildable Stick System is free software: you can redistribute it and/or modify it under the terms of the GNU General Public License as published by the Free Software Foundation, either version 3 of the License, or (at your option) any later version.
The Buildable Stick System is distributed in the hope that it will be useful, but WITHOUT ANY WARRANTY; without even the implied warranty of MERCHANTABILITY or FITNESS FOR A PARTICULAR PURPOSE. See the GNU General Public License for more details.
You should have received a copy of the GNU General Public License along with the Buildable Stick System. If not, see https://www.gnu.org/licenses/.
Lineage
Inspired by the incredible work of TheTrain on the OpenStickCommunity Fightstick Case, itself based on the incredible work by Dash n'Mash. Original work Copyright 2023 TheTrain, licensed under CC BY 4.0.
Made possible by the amazing efforts of slagcoin.
Distributing BSS Sticks
Under the terms of the GPLv3, you must inform the receiver of the "object code" of their rights under the GPLv3. This is a bit of a gray area for physical objects, but likely applies to distribution of modified or unmodified STL, STEP, etc. files at a minimum. The easiest way to satisfy the GPLv3 in either situation is to provide a link to the source code (either the unmodified mainline project, or your copy, with modifications listed in a "prominent notice"); something like the below should suffice in either electronic or printed form:
This arcade stick is part of the Buildable Stick System, version X.Y.Z; the source code to this program is available under the terms of the GNU General Public License, at [LINK].
Gallery
More photos.